Table of Contents
Note Note Note: This document is a work-in-progress, and will be updated as I actually complete the project. Some of my cost and power usage estimates may be way off, so take them with a grain of salt!
Staged Installation of Off-Grid Solar Power
Solar power can be pretty expensive to install, even when you do it all yourself! Wouldn't it be nice if you could install your solar power system in several stages over a longer period of time, while during each stage your investment would be useful (despite not being finished) and everything still worked?
Let's see if we can figure out how to do that.
Why Solar Power?
Solar power has an advantage over micro-hydro in that it doesn't stop working in the winter when the water freezes up.
So maybe the question is really "Why generate your own electricity"? Generating your own electricity is almost always more expensive than buying it from the power company and staying on the grid. So if you have the option of being on the grid, why would you want to go off-grid at all?
Well, self-reliance is one of the key ingredients in personal freedom and Liberty. Whenever you have to rely on someone else for something essential for living your life (be that your government, the power company, or even your neighbors), then whomever controls the resource that you need holds power over you. Self-reliance takes that power over us away from others, and allows us to be more free.
That is the main reason we should all be interested in generating our own power, rather than environmental reasons or whatever else. (Which isn't meant to minimize any other reasons, just that I think freedom is the most important one.)
Critical, Essential, and Optional Loads
The best way to make the most of our solar power is to reduce our electrical usage as much as possible, so that we can install a smaller (and less expensive) solar power generation system.
We will start this process by separating our electrical usage needs into three categories: Critical, Essential, and Optional.
Critical Loads
Critical loads are those functions that are required for a basic quality of life. In my particular case, this includes water pumping, cooking, heating, and lighting.
We should be able make use of these critical functions without needing any electricity at all. Perhaps some of the ways we do this without electricity are not very convenient. But we can roll these functions back into one of the other categories just for the sake of convenience, as long as we keep the non-electric basics around so that we can perform those functions without any electricity when needed!
My particular methods for solving these critical functions without electricity usage are:
- Water can be pumped via a hand pump (a pitcher pump) installed on the cap of my shallow well. If you have a deep well (20+ ft to the water), they make deep well hand pumps, too, but they are significantly more expensive.
- Cooking can be accomplished via kerosene stoves, an LPG range, the wood stove, or a primitive fire-pit in the yard.
- Heating without any electricity can be accomplished with the wood stove. Even though I plan to have a pellet stove as the main heat source and some inexpensive LPG wall units as backup, those both require electricity to fire the ignitors.
- Electricity-free lighting is accomplished through the use of oil and LPG lamps.
I do not include refrigeration as a critical function, because kerosene and LPG refrigerators are very very expensive to operate, and therefore are not a good choice for full-time use. I believe that it is better to have plenty of nonperishable foodstuffs (dry goods, etc) from which you can cook meals as you need them, rather than to rely on a kerosene/LPG refrigerator that you will probably only use during emergencies (and therefore also probably forget to keep up with the maintenance and testing on sometimes, making it unreliable).
Essential Loads
Essential loads are those loads that we really want to have running all the time, because they save a great deal of time and effort over doing things by hand. In my particular case, these functions include refrigeration, basic low-level lighting, communications, and the various augers and ignitors on the pellet and LPG heating units.
These are the loads that we'll be running on solar power, so we need to make them as efficient as possible. Then we can build a smaller (and thus less expensive) solar array.
My particular methods for solving these energy-efficient essential functions are:
- Using a chest freezer instead of an upright freezer for frozen goods. The chest units are far more efficient than the upright units, because they do not dump out all of the cold air every time you open the door. Also, units of newer manufacture tend to be more efficient than older units, in case you end up shopping for used chest freezers.
- For non-frozen refrigeration, I converted a second chest freezer into a refrigerator using an external programmable thermostat. A video about this can be viewed here.
- Basic low-level "emergency" lighting will be implemented with LED bulbs. I haven't yet decided if I will use regular (and easier to find) 120VAC edison-base bulbs or (special-order) 24VDC bayonet bulbs for this, though… The latter would be more efficient, but impossible to source replacements for locally.
- Since the fiber-optic ONT that provides my telephone and internet service runs from a 120VAC-to-12VDC battery-backed power supply, I will remove the 120VAC battery backup unit and connect the ONT directly to the 24VDC battery bank through a DC-DC converter. This will bypass the inefficiencies inherent in inverting 24VDC into 120VAC and then rectifying it back into 12VDC again (not to mention charging the extraneous battery in the 120VAC power supply unit). I will also build/buy an extremely energy-efficient computer (perhaps an ARM Linux box) for everyday web-surfing use, and save the powerful (but energy-hungry) computer for CPU-intensive (but less-common) tasks such as video encoding, programming, and gaming. I will also retire my file server / RAID array and move my mass storage onto an energy efficient RAID-0 NAS unit built from an OpenWRT router and a couple of USB disks.
- I should also be able to power various ham radio equipment from the same DC-DC converter above.
- The LPG and pellet stove ignitors are such an instantaneous and nonconstant function that it is probably not worth trying to replace them with DC units. Some non-electric LPG units use a pilot flame instead, but the ignitors are a very small/momentary load and not worth fretting over regardless.
- I haven't bought my pellet stove yet, so I don't know if the auger motor is DC or AC. I expect that it is probably a small AC motor, and likely not worth trying to replace with a DC unit either.
Optional Loads
Optional loads are the high-amperage intermittent loads that would overload a small solar power system. These are the sorts of loads that we don't need to run very often, but still need sometimes. For me, this includes things like the arc welder, halogen work lighting, power tools, and (unfortunately) my 30A 240VAC well pump.
It makes more financial sense to just run these loads with a generator when needed. To power them with the solar array, the system would need to be drastically upsized, and most of the extra power generated would be wasted each day once the batteries start floating.
Although there are low amperage DC well pumps available, they are expensive and do not pump very fast. Such pumps generally require an elevated tank, into which they pump slowly over time (and only during the day). Then the water is gravity-fed to the various faucets and hydrants. I intend to experiment with this at some point, testing with the existing well pump before buying an expensive DC unit and increasing solar capacity to match it. But since I won't be disconnecting from the grid for a good while yet, it is not high on the priority list. The hand pump will suffice for now, if the grid power is out and the electric pump can't be powered.
Staged Installation Strategy
So, the whole idea here is to spread the cost of components out over time, while still having something useful in the meantime.
We must be sure to familiarize ourselves with local building codes and inspection requirements. These sorts of things can vary drastically from one locale to another. Fortunately, the only inspection required in my locality is by the electric company when the grid service is installed, and even then only to the first disconnect. Also, building permits are not required here to install solar panels or to modify an existing structure; they are only required when building a new structure.
If you plan to buy land upon which to go off-grid, rather than doing it at your existing home, it is worth looking into these sorts of things before you make your decision. Having nosy government bureaucrats forcing you to comply with piles of ridiculous regulations slows things down and greatly increases costs.
Also, we should be sure to familiarize ourselves with basic electrical practices and wire sizing rules. Electrical work is not difficult if we take our time and double-check ourselves, but improperly sized wire can at best cause voltage drops (resulting in appliances not working as they should) and at worst burn down the house. When in doubt, err on the side of larger wire, even though it costs a little more.
We must keep our wire runs neat, and label the ends. It seems pedantic at first, but when we have to go back and fix something a year from now after we've forgotten what is what, we'll be glad that things are labeled.
We try to avoid working in powered ("hot") panel boxes whenever possible, but sometimes it is unavoidable. We'll test things with our meter to make sure we turned off the right feeders, and be careful of what we touch (or can touch accidentally if we should slip or lose our grip on something), and of setting tools and such inside of hot panel boxes. Mostly common sense stuff, but maybe still worth mentioning.
As our installation progresses though the stages, things get more complicated. And as things get more complicated, we increase the chances of making a mistake or turning off the wrong thing and reaching into a hot panel box. So we must take our time, double-check, and be careful.
Typical Household Grid Power
This diagram illustrates the typical residential electrical power distribution system. Typically, the power company will run an electrical drop cable from the pole to the house, into a meter head on the outside of the structure. Then, a service entrance (SE) cable penetrates the structure and runs to the main breaker in the panel box. From there, the various circuits in the structure are fed from circuit breakers installed in the panel box.
The first thing we will want to do is to install a service disconnect on the outside of the house, below or next to the meter head. The power company will need to turn off the power at the pole or pull the meter head while we wire the disconnect into the meter head. Then once we are done, a licensed electrician will need to inspect the installation and approve it before the power company will restore power. Don't pull the meter head yourself, or you will get in trouble with the power company. Call them and make them do it.
I have made a video of installing my service disconnect. You can find it here, on my YouTube channel.
Be careful when working inside of the service disconnect. The main breaker lugs in the disconnect will always be hot once the power company turns the power back on. Don't touch the main breaker lugs, and be safe. Also use dielectric grease on aluminum cable ends (which I didn't do in that video), or the inspector will complain. If you use copper SE cable, you don't need the dielectric grease.
Once we have the disconnect installed, we will need to wire our original breaker panel into the disconnect as a subpanel. This requires that we unbond the ground in the original panel and pull in a new SE cable that has an insulated neutral and a separate ground. If you are not sure what I am talking about, the video may be helpful if you can force yourself to sit through my rambling. Again, don't forget the dielectric grease if you are using an aluminum SE cable from the disconnect to the breaker box.
Here is another video illustrating some of this work.
Once all this is done, we are back to business as usual, except that we can go outside to the service disconnect and turn off power to the whole house when we work on the main breaker panel again later on, without having to call the power company to pull the meter head and get things inspected all over again.
If you are worried about nuclear EMP or solar flares or somesuch, you may actually want to put your disconnect box on a pole or shed away from the house, and then bury cable from it to your house, connected into the disconnect with some sort of big pin-and-sleeve connector appropriately sized to your service. Then you'll be able to completely physically disconnect the whole shebang from the grid when you don't need to use it.
You may also want to go ahead and separate your optional and essential loads (next section) at this time, too, if you will be downsizing your panel amperages and installing smaller cable like I am. Otherwise, you're just wasting money on that big 4-conductior SE cable and then throwing it out later. Oops.
Cost
Components
200A Service Disconnect: $70
4/0-3 Aluminum SE Cable: $3.50/foot, $35/10'.
Totals
Stage Cost: $105
Cumulative Cost: $105
Separate Optional and Essential Load Panels
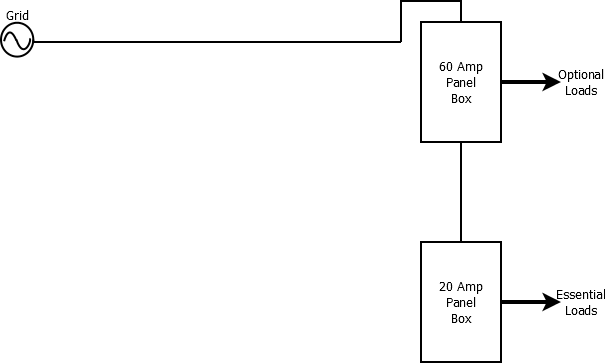
The next step is to separate our optional (generator or grid) loads from our essential (solar) loads, as we discussed previously. In my case, I am downsizing my panel box for the optional loads to 60 or 100 amps, but you can keep using your original main panel for that if you wish.

(I want to use my original 200A main panel in a machine shop that I plan to build in the coming years, though, so I will go ahead and replace it with a smaller panel now.)
All we really have to do in this step is to install a subpanel, fed from a breaker in the main breaker panel, and move all of the essential loads to it. I will be using an inexpensive main lug panel for this, rather than a main breaker panel, and "back-feeding" it through a double-pole breaker (which is perfectly acceptable in this context; most standard breakers will work either way). It is not technically necessary to have a disconnect breaker on this subpanel at all, but it adds a little bit of convenience and safety once we install the transfer switches.
You may want to go ahead and install the transfer switches (next section), although you can do it later if you want. You'll waste a little wire that way, though.
Cost
Components
125A 8-Space Main-Lug Panel Box: $25
20A Double-Pole Breaker: $10
Totals
Stage Cost: $35
Cumulative Cost: $140
Transfer Switches
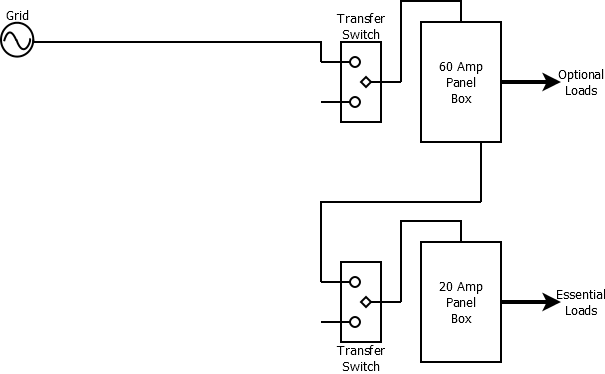
Since we will eventually want to be able to switch the essential panel over to solar power and the optional panel over to generator power, our next task is to install a couple of on-off-on manual transfer switches. We won't have anything hooked up to the second input of either of them at this point, but they will be there and ready to be wired into once we have gathered all of the components to proceed to the next stage.
It is a good idea to feed your panels through a breaker from the disconnects, even though there is a breaker upstream. Just for that little bit of added security when we are switching between multiple power sources. If you end up using inexpensive residential transfer switches with no center-off position, you will want to be able to use those breakers to turn everything off for maintenance as well.
Cost
Listed cost is for a brand new Reliant 100 amp transfer switch (without a center-off position). Brand new transfer switches (especially the good ones) are very expensive, so these are a good thing to look for on the used market (I got both of mine for free, and fairly nice Square-D industrial units to boot).
Or you can make your own transfer switch with an inexpensive main-lug panel box (the kind with two columns of spaces next to each other), a couple of double-pole breakers (the kind with a hole through the switch lever; mounted next to each other), and some thick wire and scrap metal to make a linkage between them. Your homeowner's insurance may frown on that, though. And you'll need to be double sure that something isn't going to come loose and allow both back-fed breakers to be turned on at the same time; if they both get turned on at the same time, it can break your appliances.
Note however that the transfer switch between the service disconnect and the optional-load panel box will need to be rated for the same current as you are feeding to the panel box. So if you have a 200 amp service and a 100 amp transfer switch, you'll have to feed your panel box via a 100 amp branch breaker in the disconnect instead of through the feed-through lugs.
Components
100A Residential Transfer Switch: $130/each, $260/two
Totals
Stage Cost: $260 (or way less, if you shop used)
Cumulative Cost: $400
Battery Bank, Charger/Tender, and Inverter
At this point (if you are as poor as me), you've probably drained your electrical budget for now. We can collect the components for this stage over time, and then install them once we have everything. This is the most expensive stage, as the battery bank is by far the most expensive (and fragile) part of the off-grid solar power system (technically the solar panels may cost a little more, but they only need replaced 20-25% as often). Buy your batteries as the very last thing, and don't let them sit around for too terribly long. If they sit around for a long time and their charge bleeds off until they are dead, it will damage them.
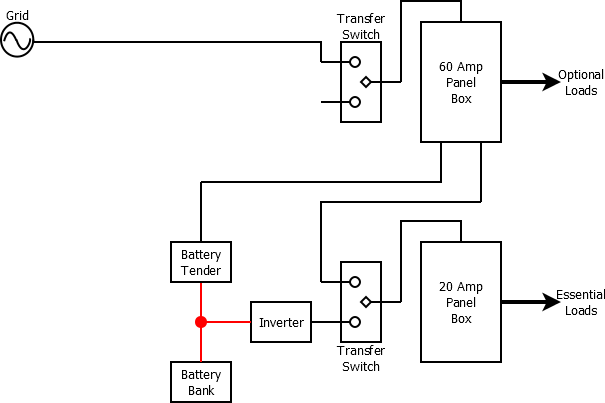
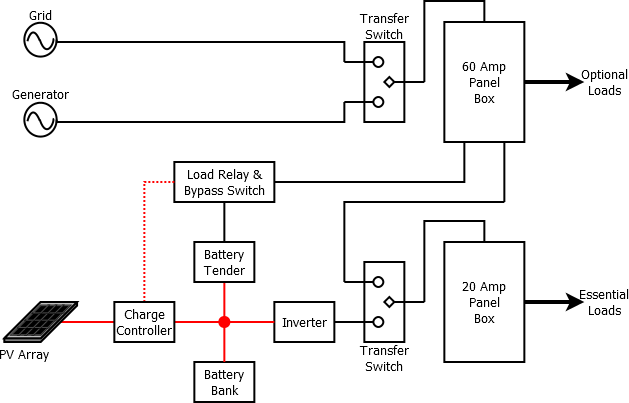
The red lines in the above diagram represent DC circuits, whereas the black lines represent AC circuits.
This stage includes no solar panels, but has the battery bank charging from grid power. Even though we're not off grid yet, we still have that battery bank to provide uninterrupted emergency power for two or three days of grid failure. So it's not completely useless.
Repeated charging and discharging is what wears out batteries. Since the battery bank will be charging in float mode from grid power both day and night (assuming we size our charger properly), wear and tear on the batteries will be essentially nil until the last stage when we can finally disconnect the grid power.
My battery bank will be configured for 24 volts, and I plan for it to eventually be made up of eight or twelve 6 volt 225 aH Trojan T-105 golf cart batteries. For now, however, I have obtained four 12 volt 170 aH UPS batteries for free, so I will use them at first as I learn what I am doing. They are not the right kind of deep cycle battery for this application, but they were free. The conventional wisdom says that the budding solar-power user almost always cooks their first battery bank before they figure out what they are doing. So hopefully I can get that out of the way with the free batteries before spending a pile of money on the golf cart batteries.
The tender/charger will probably be a 24V NOCO G26000 smart charger, which according to reviews are being used successfully in other off-grid installations. It does bulk and float charging the same way that the solar charge controllers do, and has a desulfation function.
I will be using a 2kW Samlex pure sine wave inverter. There isn't much to say about that, except that we want to use an inverter designed to be hard-wired into the AC electrical system. Apparently the sorts of inverters that are intended to be used in vehicles sometimes have the DC and AC grounds bonded together, which can cause some problems if we wire it into a household electrical system that has the ground and neutral bonded elsewhere.
Once all of this is wired in, we can throw the transfer switch and smile as our essential loads are protected from short-term grid outages. If something goes wrong with the charger/inverter/batteries, we can always just throw the transfer switch back and easily restore power to the essential loads.
Another large advantage of staging the build like this is that now we can simulate different amounts of solar panels and different amounts of sunlight per day, by throwing power to the charger for a certain amount of time each day and then turning it off and running purely from battery power until the next day. This way, we can more firmly figure out exactly how many watts of panels and how many aH of battery storage we need, before forking out all that money for all those solar panels.
This battery bank may be over-sized for my particular problem domain. Once everything else is in place, I will likely buy four batteries and test usage, and then buy four more if the first four are not enough, and test again. If that still isn't enough, then I'll buy another set of four. But hopefully one string of four batteries will be enough.
The 2kW inverter may be slightly over-sized. The initial starting surge of the chest freezers is 500W, so in the unlikely case that they both start at the same time, we will need to be able to source at least 1kW until their starting surge is over. Add to that various small loads such as the pellet stove auger and a bit of electronics, and we may need to be able to handing surges of 1.5kW. The Samlex inverters are fairly good, and can handle surges for a short time, so their 1.5kW unit may be enough for my particular problem domain (or a 1kW unit, if they made one). But on the other hand, it is always good to have a little extra capacity available for the sake of convenience (maybe a power tool now and then or somesuch).
Cost
Components
Trojan T-105 Batteries: $150/each, $600 per 24v series string, $1200 for two strings in parallel
NOCO G26000 24V 26A Smart Charger: $185
24V 2000W Samlex Inverter: $650
#4 THHN Wire: $0.85/ft, $17 per 20 ft
Misc Guesstimation (ring terminals, etc): $30
Totals
These totals are the worst-case scenario. If testing indicates that we can make do with only four batteries and the 1.5kW inverter, our stage cost would be reduced to around $1200.
Stage Cost: $2082
Cumulative Cost: $2482
Solar Panels and Charge Controller
Once we've done some experimentation with the grid-based charger, figuring out how many watts of panels we will need and sizing our battery bank appropriately, we can proceed to install the solar panels and the charge controller.
I haven't decided what type of panels to use yet. Since we often experience significant snowfall in the winter months, I am leaning towards Canadian Solar brand panels. But panel prices tend to be somewhat fluid, so I will research this more when the time comes.
The charge controller I am planning to use is a 24 volt Tracer MPPT unit, probably the 30A or the 40A one, depending on what they cost when the time comes. The MPPT charge controllers are essentially a variable DC-DC converter, which (without going into a bunch of math) allows you to convert your extra panel voltage into extra charging amps instead of just wasting it.
The Tracer units can take an input voltage of up to 150 VDC. If we recall that Watts = Amps x Volts, and that wire size is determined by ampacity and is independent of voltage, we can see that we can use smaller (and thus cheaper) wire at higher panel voltages, while transmitting the same amount of power as we would with a larger wire at lower voltage. So we will arrange our panels in a series-parallel arrangement so that their output voltage hangs around 100 VDC, but never exceeds 150 VDC (which will cause the charge controller to shut itself down and enter an error condition until reset manually). Thus with the high panel voltage, we can use standard (inexpensive) #10 or #12 THWN wire in buried PVC conduit to run power from the panels to the charge controller.
The panels will be mounted on the south side of the house. In order to avoid cutting down the trees that shade my house, I will probably expand my yard fence beyond the trees and build a wooden frame to the south of the trees to mount the panels on (I can't just build it out in the pasture, or the cattle will rub all over them and tear them up). The run from the panels to the charge controller should still be less than 100 feet, so voltage drop shouldn't be a problem.
Instead of purchasing expensive "combiner boxes" for the panels, I will simply cut off the fancy connectors and splice with wire nuts inside standard junction boxes mounted beneath the panels where the rain cannot get in, using Romex connectors as strain relief bushings, and sealing them with silicone to keep the insects out. If more than two strings of panels will be wired in parallel, I will use inline fuse holders instead of expensive DC breakers, squirreled away inside the junction boxes.
As previously mentioned, the battery bank is the most expensive part of the whole installation, and wears out faster the more deeply it is discharged. At the usual 20% discharge cycle, the battery bank must be replaced every 4 or 5 years. Each T-105 battery costs about $150, so 8 or 12 of them is a significant expense.
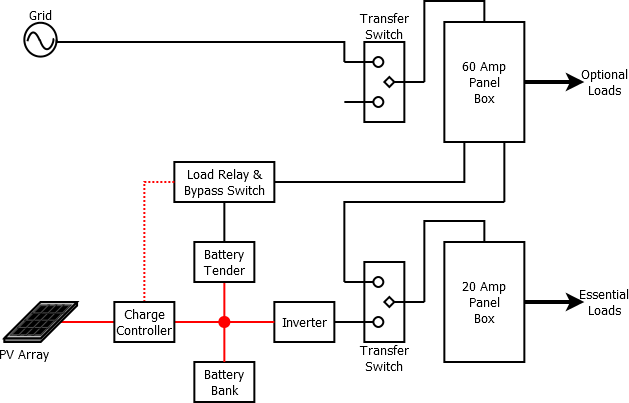
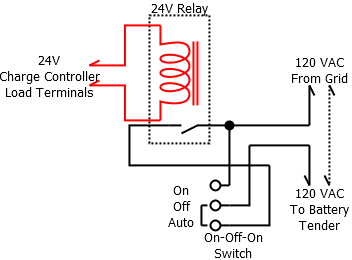
The particular series of Tracer charge controller that I am planning to use features a set of 24 volt programmable load terminals. Among other things, these load terminals can be set to apply power when the solar panels are not generating any power, as a "dusk-til-dawn" function.
To help preserve the life of the battery bank, as long as grid power is available, I plan to use the load terminals on the charge controller to trigger a 24 volt relay, which will turn the grid-based charger back on at night. This should prevent the battery bank from ever discharging below 5% or so, which in theory could allow the batteries to last for the whole 20-year lifespan of the solar panels. And since the charger will turn off in the daytime, we will still be making full use of our solar power instead of running up the electric bill with the charger all day.
This relay circuit can also incorporate a SPDT on-off-on switch to allow the grid charger to be switched between on, off, and auto (night time charging) modes. A possible diagram for this arrangement is below.
Cost
Components
Canadian Solar 310W Solar Panel: $310, 6x Panels (1860 watts) $1860
Tracer 30A Charge Controller: $170
24V Relay and Switch: Negligible
Totals
Stage Cost: $2030
Cumulative Cost: $4512
LPG or Diesel/Kerosene Generator
The final step to achieving our grid-independence will be to permanently install a generator, wired into the remaining leg of the remaining transfer switch.
At this point, we could completely disconnect grid power and run all of our optional loads from the generator. But grid power is way cheaper than buying fuel for a generator. Therefore, I will probably leave the grid power connected, just to avoid buying so much fuel, and have the generator around for use in grid-down scenarios.
If one is worried about nuclear EMP or sunspots causing large voltage spikes on power transmission lines, the cabling running from the grid service disconnect to the transfer switch could have some sort of large pin-and-sleeve connector arrangement installed on it, so that the grid can by physically unplugged from everything when it is not being actively used. Personally, I think that the step-down transformer on the pole would explode before the high voltage could arc across the (open) transfer switch terminals (and we'll have better things to worry about if someone nukes us, anyway), so I don't plan to take it that far. But it's an option if such things worry you, if you don't want to be permanently without grid power for cheapness' sake.
Cost
Components
8kW LPG Generator: $2500
Totals
Stage Cost: $2500
Cumulative Cost: $7012
Is it worth the cost and effort?
We didn't factor in any lumber for building the solar panel frames, nor small gauge wire, connectors, shipping fees, or other incidentals. If we multiply our total cost by a factor of 1.5 to account for this, we end up with a total cost closer to $10,000. Assuming that the system lasts for 20 years, with two complete battery replacements during that time, that comes to about $620 per year, or about $50 per month. That's probably about what we'd be paying the power company, so perhaps it is safe to say that such a system would pay for itself in 20 years. That is not taking into account the fuel usage for powering the optional loads with the generator now and then. But careful use of an LPG generator will not increase the "monthly" cost too awfully much.
Costs can be reduced by forgetting the generator, staying on-grid, and keeping the battery bank floating at night with grid power. But is it worth it?
I think most of us can afford $50/month. We each probably spend at least twice that frivolously each month (that would pay for the generator fuel, too). When it helps us to be the solution instead of the problem, when the grid is down or our Liberty is at stake, I think it is very worthwhile to spend the money. But maybe I am crazy.


